Open a PDF File
Please choose one of the following to open a local PDF file with Foxit PhantomPDF Mac:
- Choose File > Open > select the PDF file in the Open dialog box > click Open.
Tip: If you select a non-PDF file (Microsoft Office, image, HTML, or TXT file) in the Open dialog box, Foxit PhantomPDF Mac will convert it to PDF. For more information about PDF creation and conversion, please refer to "Create and Convert PDF Files".
- Launch Foxit PhantomPDF Mac, then drag and drop the PDF file in the Foxit PhantomPDF Mac workspace.
- Right-click the PDF file, and choose Open With Foxit PhantomPDF.
- If you have set Foxit PhantomPDF Mac as the default PDF reader, you can double-click the PDF file directly to open it with Foxit PhantomPDF Mac.
- Click the Start tab in the main interface > click
 > select the PDF file > click Open.
Read PDF Files in Multiple Instances
By default, Foxit PhantomPDF Mac displays multiple PDF files in different tabs in a single instance. However, you can enable multiple instances mode to view PDF files in multiple instances when double-click to open PDF files, which is ideal for reading PDF side by side.
To enable multiple instances mode, go to Foxit PhantomPDF > Preferences > Documents, check the Allow multiple instances option in Open Setting group, and click OK to apply the setting. While in multiple instances mode, you can revert to single instance mode by redoing the steps and unchecking the Allow multiple instances option.
Adjust PDF Views
Change the Page Display Mode
- Click
 in the Common Tools toolbar;
 - Choose one of the following options:

 Single Page: Display one page at a time.
 Continuous: Display the pages in a continuous vertical column.
 Facing: Display two pages side by side at a time.
 Continuous Facing: Display facing pages side by side in a continuous vertical column.
 Separate Cover Page: Display the cover page separately. This option is only available when you select Facing or Continuous Facing mode.
Tip: Alternatively, you can choose View > Page Display, and then select the desired mode from the drop-down menu.
Read a PDF in Full Screen Mode
In Full Screen mode, Foxit PhantomPDF Document Pane fills the entire screen, with Menu Bar and Navigation pane hidden behind. The mouse pointer remains active in Full Screen mode so that you can click links.
Set Full Screen Preferences
Before reading a PDF file in Full Screen mode, you can set the Full Screen preferences which include appearances, transitions, and panels that can be shown in the Full Screen mode.
- Choose Foxit PhantomPDF > Preferences to open the Preferences dialog box.
- Choose Full Screen in the Preferences dialog box, and then do the following:
- Specify whether to show the scroll bar, tab bar, navigation panels, exit button or not in Full Screen mode by checking or unchecking the corresponding option in the Full Screen Navigation group. By default, Foxit PhantomPDF Mac will display a single page at a time in Full Screen mode. To display pages continuously in Full Screen mode, uncheck the One page at a time option.
- In the Full Screen Appearance group, click the color palette to choose the background color in Full Screen mode.
- In the Full Screen Transitions group, choose a default transition and its direction from the drop-down list. If you need to control the page transition based on your navigation direction, check the Navigation control direction option. To ignore all transitions, check the Ignore all transitions option.
- Click OK in the Preferences dialog box to apply the settings.
Enter and Exit Full Screen Mode
- Click View > Enter Full Screen to enter Full Screen mode.
- Click the Exit Full Screen Mode button
 on the top right corner, or press the Esc key to exit Full Screen mode.
Resize the Page View
Use the Zoom tools in the Common Tools toolbar to adjust the zoom level of the page.
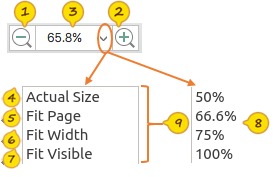
 Zoom Out: Zoom out of the page.
 Zoom In: Zoom in the page for a clearer view.
 Zoom To: Resize the page to a specific zoom level
 or make the page fit the window
 .
.
 Actual Size: Display the page in its actual size.
 Fit Page: Resize the page to fit entirely in the document pane.
 Fit Width: Resize the page to fit the width of the window. Part of the page may be out of view.
 Fit Visible: Resize the page to make the text and images fit the visible width of the window, removing the margins.
Tip: Alternatively, you can choose View > Zoom, and then choose one option from the drop-down menu to adjust the zoom level. You can also pinch with two fingers to zoom in or out on the PDF file with the Mac trackpad.
Rotate the Page View
Do one of the following to rotate the view of the document pages:
- Go to View > Rotate View > Rotate Right or Rotate Left.
- Clickin the Common Tools toolbar > choose Rotate Left
 or Rotate Right
 .
. - Right-click the document, and choose Rotate Right or Rotate Left.
- Move two fingers around each other with Mac trackpad.
Note: The rotate view setting only temporarily changes your view of the page in 90-degree increments. If you need to change the page orientation and save the changes to the PDF file, please use the “Organize PDF Pages” features.
Change the Page Background Color
Do one of the following to change the page background color:
1. From the Preferences
- Choose Foxit PhantomPDF > Preferences to open the Preferences dialog box.
- Select General in the Preferences dialog box.
- In the Document Color Options group, the Replace document colors option is checked by default. If this option is not checked, please check it first.
- Click the color pane beside the Page Background or Document text option.
- In the pop-up Colors window, select or customize a color, and click OK.
- Click OK in the Preferences dialog box to apply the color.
2. From the document pane
- Go to Foxit PhantomPDF > Preferences > General > to make sure that the Replace document colors option is checked.
- Click
 in the Common Tools toolbar .
 - Click the Change Color icon
 .
.
- Select a color from the preset list.
View PDF/A Files
By default, Foxit PhantomPDF Mac will open PDF/A-compliant documents in PDF/A mode (i.e. read-only mode) to prevent modification. When you open a PDF/A-compliant document, a notification message will be displayed. To work with PDF/A files, do the following:
- To turn off PDF/A mode and edit the document, click Enable Editing on the notification message. This operation will affect the settings in PDF/A view mode preference. To set the preference about PDF/A view mode, go to Foxit PhantomPDF > Preferences > Documents, and select the desired option from the drop-down list in PDF/A View mode group.
- To keep reading in PDF/A mode, click Disable Editing on the notification message.
- If you do not want to see the notification message the next time you open PDF/A files, check the Don't show again option. To redisplay the notification message, please go to Foxit PhantomPDF > Preferences > General, and check the Show PDF/A message again option in the Notification Messages group.
Search and Find Text
Use the Find tools in the Common Tools toolbar to search and find text.
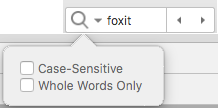
- Input text in the search box.
- Click
 , and check the following option(s) if needed:
 - A. Case-Sensitive: Make the search case sensitive.
- B. Whole Words Only: Limit the search to match only whole words.
- Press Enter to search the text in the currently opened PDF file.
- Click
 or
or to jump to the previous or next search result.
Take a Snapshot of Selected PDF Contents
Use the Snapshot tool to take a snapshot of selected PDF contents and paste it in other applications.
- Click Tools > Snapshot;
- Drag across the area that you want to copy; or right-click on the document and choose Select All to select all of the contents;
- (For copying selected area) You will be prompted that the selected area has been copied to the clipboard, click OK in the dialog box;
- Paste the selected image to other application(s) as desired.
Navigate PDF Files
Jump to a Specific Page
Use the page navigation tools in the Common Tools toolbar to jump to a specific page easily.

 Page indicator: Shows the current page and the total number of pages of the opened PDF file. You can input the page number and press Enter to jump to the page specified.
 Previous Page: Jump to the previous page.
 Next Page: Jump to the next page.
Tip: Alternatively, you can go to View > Go to, and then choose one option from the drop-down menu to jump to a specific page. From the drop-down menu, you can also choose to jump to the first page or the last page of the PDF file.
Jump to the Previous View or Next View
Do one of the following to go to the preview view or next view:
- Click
 in the Common Tools toolbar > click the Previous View button
  or Next View
  button .
 - Click View > Go to > Previous View or Next View.
Jump to a Specific Chapter by Bookmark
- Click
 in the Common Tools toolbar to open the Navigation panel if it is hidden;
 - Click the Bookmark button
 on the Navigation panel to open the Bookmarks panel;
 - Click the bookmark to jump to the specific chapter.
Jump to a Page by Thumbnail
- Clickin the Common Tools toolbar to open the Navigation page if it is hidden;
- Click the Page button
 on the Navigation panel to open the Pages panel;
 - Click the thumbnail to jump to the specific page.
Open a File Attachment
Open a file attachment embedded in a PDF file
- Clickin the Common Tools toolbar to open the Navigation panel if it is hidden;
- Click the Attachment button
 on the Navigation panel to open the Attachments panel;
 - Double-click the file that you want to open with Foxit PhantomPDF Mac.
- In the Open File Attachment dialog box, choose the option as desired, and click OK.
Open a file attachment pinned in the PDF file
The file attachment pinned in the PDF file is usually displayed with a pin icon. You can double-click the pin icon to open it with Foxit PhantomPDF Mac.
Compare PDF Files
The Document Compare feature lets you see the differences in two versions of a PDF.
Compare Two Versions of a PDF File
- Click in the Common Tools toolbar.
- Click the Compare button
 in the View toolbar.
 - Click Choose to select the Old File and New File to be compared. After selecting PDF files, you can preview the pages of both files. Choose the specific page you want to preview by inputting the page number in the Preview Page field, or clicking the up/down arrow beside the Preview Page field. You can also click the Swap icon
 between the thumbnails to swap the position of the old and new files.
 - By default, Foxit PhantomPDF Mac will compare all the pages in the selected document. You can limit the comparison to a portion of the documents by entering the page number or clicking the up/down arrow in the Compare Page Range group.
- (Optional) Check the following option to specify the content that you want to compare, if necessary.
- Compare Text Only: Compare the text content only, and ignore differences between graphic elements.
- Compare Table: Compare tables in your documents.
- Click OK. And Foxit PhantomPDF Mac will display the results in a new document. To check the comparison results, please refer to "Check Comparison Results".
Check Comparison Results
Once the documents are analyzed, a PDF document named "The result of Comparison.pdf" will be automatically created and opened in a new tab within the application window, and the Compare File panel appears on the right of the document pane. When checking the comparison results, you can click the Compare button on the View toolbar to show or hide the Compare File panel.
The result document arranges pages side by side showing Old File and New File with the changes marked by different icons and colors. The first page shows a summary of the comparison results including the total number and the marks for different changes. The second page shows the detailed comparison results including the names and sizes of Old File and New File, time compared, and the classification of changes, with a color legend in the upper right corner.
To check the comparison results in detail, please do the following:
- Click Go to the First Change (page number) on the Compare Results page to jump to the first change. Click Previous Change or Next Change in the Compare File panel to navigate through the changes in the document pane in both files.
- Do any of the following to specify the display options in the Compare File panel:
- In the Filter group, check the items to filter comparison results by text, image/graphic, annotation, or formatting. Select Everything to show all changes.
- In the Show group, select items to show/hide the results and color legend. If the Show Result option is checked, the documents will be marked with annotations indicating the changes. You can double-click the annotation mark to check the details about the changes in a pop-up note. While reviewing documents, you can click Show Summary to navigate to the summary page directly.
- You can also use the Comments panel in the navigation pane to see each change. Click a change to quickly locate it in both documents. See also "View All Comments".
- (Optional) Click the Save button
 (or choose File > Save) to save the comparison result document, if necessary.